
I put the crochet cartoon eyes on CAT HATS! They work purrrfectly especially with this Halloween inspired color palette! I’m ready for spooky season!
I honestly can’t get enough of Red Heart Super Saver in color pumpkin. This bright orange is going to be on my hook all of October. Grab a few skeins HERE on Yarnspirations.com.
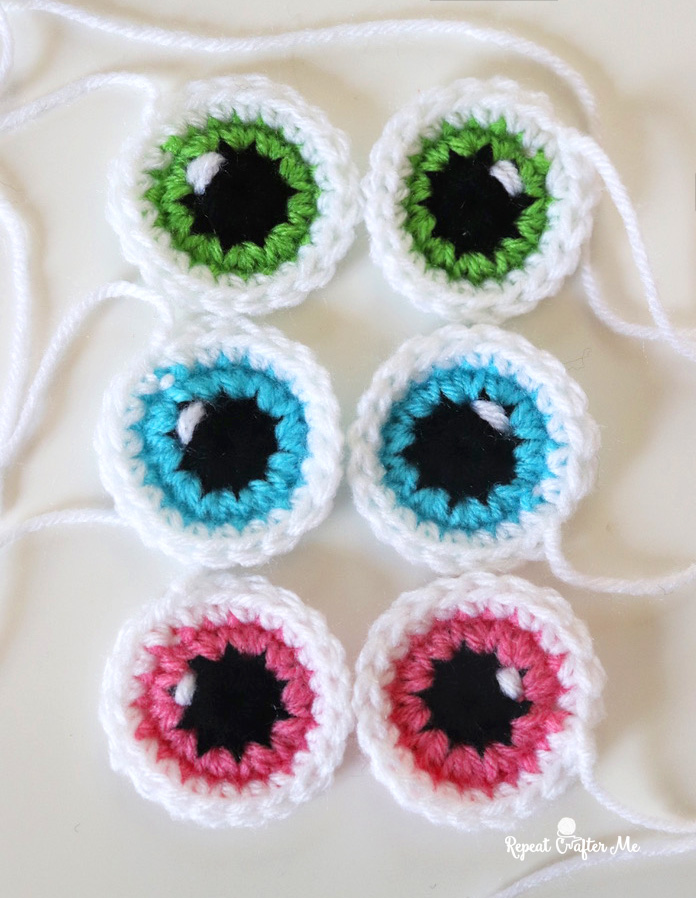
If you haven’t seen my Crochet Cartoon Eye pattern yet, CHECK IT OUT HERE. It’s a very simple and comes in two sizes! I’ve been using these eyes on several projects and this is the third crochet pattern in the cartoon eye series. See the first two projects: Jellyfish Plushie and Sea Turtle Plushie.
Before we start the pattern, please be sure and watch THIS TUTORIAL from my friend Daisy Farm Crafts on how to make a single crochet ribbed border. I use this on the bottom of all the hats. I love this technique because you don’t need to sew the ribbing on separately, it is crochet right onto the edge of the hat! It’s basically a chain 7, SC in each chain until you get back to the hat edge, slip stitch in two stitches along the hat edge and then SC in the back loops of the ribbing and repeat. She has a VERY easy tutorial to follow and you can use this border on many different projects.

Materials:
– Red Heart Super Saver Yarn in colors Pumpkin Orange, Orchid, Black, and a bit of Perfect Pink for the nose and whatever colors you are using for the cartoon eyes (black, white, spring green, bright yellow, pictured) Shop all colors HERE on Yarnspirations.com.
– Size H Crochet Hook
– Crochet Cartoon Eye Pattern (Note: I am using the larger 2 inch size for all the hats but the smaller size could work well on the newborn version)
– Tapestry needle

Start with the basic HAT PATTERN which comes in sizes Newborn – Adult!
Size: Newborn
Magic ring, chain 2 and make 11 DC in ring, join to first DC, chain 2
Round 2: 2 DC in each stitch around, join, chain 2 (22 DC)
Round 3: 2 DC in first, DC in next, repeat around, join, chain 2 (33 DC)
Round 4: 2 DC in first, DC in next 2, repeat around, join, chain 2 (44 DC)
Round 5-7: DC in each around, join, chain 2 (44 DC)
Round 8-10:DC in each around, join, chain 2 (44 DC)
Do not fasten off, continue to ribbed edge using the back loop SC ribbed border technique
Size: 3-6 Months
Magic ring, chain 2 and make 11 DC in magic ring, join to first DC, chain 2
Round 2: 2 DC in each around, join, chain 2 (22 DC)
Round 3: 2 DC in first, DC in next, repeat around, join, chain 2 (33 DC)
Round 4: 2 DC in first, DC in next 2, repeat around, join, chain 2 (44 DC)
Round 5: 2 DC in first, DC in next 10, repeat around, join, chain 2 (48 DC)
Round 6-11: DC in each around, join, chain 2 (48 DC)
Do not fasten off, continue to ribbed edge using the back loop SC ribbed border technique
Size: 6-9 Months
Magic ring, chain 2 and make 11 DC in magic ring, join to first DC, chain 2
Round 2: 2 DC in each around, join, chain 2 (22 DC)
Round 3: 2 DC in first, DC in next, repeat around, join, chain 2 (33 DC)
Round 4: 2 DC in first, DC in next 2, repeat around, join, chain 2 (44 DC)
Round 5: 2 DC in first, DC in next 10, repeat around, join, chain 2 (48 DC)
Round 6: 2 DC in first, DC in next 11, join, chain 2 (52 DC)
Round 7-12: DC in each around, join, chain 2 (52 DC)
Do not fasten off, continue to ribbed edge using the back loop SC ribbed border technique
Size: 9-16 Months
Magic ring, chain 2 and make 11 DC in magic ring, join to first DC, chain 2
Round 2: 2 DC in each around, join, chain 2 (22 DC)
Round 3: 2 DC in first, DC in next, repeat around, join, chain 2 (33 DC)
Round 4: 2 DC in first, DC in next 2, repeat around, join, chain 2 (44 DC)
Round 5: 2 DC in first, DC in next 10, repeat around, join, chain 2 (48 DC)
Round 6: 2 DC in first, DC in next 11, join, chain 2 (52 DC)
Round 7: 2 DC in first, DC in next 12, join, chain 2 (56 DC)
Round 8-13: DC in each around, join, chain 2 (56 DC)
Do not fasten off, continue to ribbed edge using the back loop SC ribbed border technique
Size: Toddler/Preschooler
Magic ring, chain 2 and make 11 DC in magic ring, join to first DC, chain 2
Round 2: 2 DC in each around, join, chain 2 (22 DC)
Round 3: 2 DC in first, DC in next, repeat around, join, chain 2 (33 DC)
Round 4: 2 DC in first, DC in next 2, repeat around, join, chain 2 (44 DC)
Round 5: 2 DC in first, DC in next 10, repeat around, join, chain 2 (48 DC)
Round 6: 2 DC in first, DC in next 11, join, chain 2 (52 DC)
Round 7: 2 DC in first, DC in next 12, join, chain 2 (56 DC)
Round 8: 2 DC in first, DC in next 13, join, chain 2 (60 DC)
Round 9-14: DC in each around, join, chain 2 (60 DC)
Do not fasten off, continue to ribbed edge using the back loop SC ribbed border technique
Size: Child
Magic ring, chain 2 and make 11 DC in magic ring, join to first DC, chain 2
Round 2: 2 DC in each around, join, chain 2 (22 DC)
Round 3: 2 DC in first, DC in next, repeat around, join, chain 2 (33 DC)
Round 4: 2 DC in first, DC in next 2, repeat around, join, chain 2 (44 DC)
Round 5: 2 DC in first, DC in next 10, repeat around, join, chain 2 (48 DC)
Round 6: 2 DC in first, DC in next 11, join, chain 2 (52 DC)
Round 7: 2 DC in first, DC in next 12, join, chain 2 (56 DC)
Round 8: 2 DC in first, DC in next 13, join, chain 2 (60 DC)
Round 9: 2 DC in first, DC in next 14, join, chain 2 (64 DC)
Round 10-15: DC in each around, join, chain 2 (64 DC)
Do not fasten off, continue to ribbed edge using the back loop SC ribbed border technique
Size: Teen/Adult
Magic ring, chain 2 and make 11 DC in magic ring, join to first DC, chain 2
Round 2: 2 DC in each around, join, chain 2 (22 DC)
Round 3: 2 DC in first, DC in next, repeat around, join, chain 2 (33 DC)
Round 4: 2 DC in first, DC in next 2, repeat around, join, chain 2 (44 DC)
Round 5: 2 DC in first, DC in next 10, repeat around, join, chain 2 (48 DC)
Round 6: 2 DC in first, DC in next 11, join, chain 2 (52 DC)
Round 7: 2 DC in first, DC in next 12, join, chain 2 (56 DC)
Round 8: 2 DC in first, DC in next 13, join, chain 2 (60 DC)
Round 9: 2 DC in first, DC in next 14, join, chain 2 (64 DC)
Round 10: 2 DC in first, DC in next 15, join, chain 2 (68 DC)
Round 11-16: DC in each around, join, chain 2 (68 DC)
Do not fasten off, continue to ribbed edge using the back loop SC ribbed border technique


Cat Ears (make 2):
with main hat color
Magic Ring, chain 1 and make 6 SC in ring, join, chain 1
Round 2: SC in each stitch around, join, chain 1 (6 SC)
Round 3: 2 SC in first stitch, SC in next 2, repeat around, join, chain 1 (8 SC)
Round 4: 2 SC in first stitch, SC in next 3, repeat around, join, chain 1 (10 SC)
Round 5: 2 SC in first stitch, SC in next 4, repeat around, join, chain 1 (12 SC)
Round 6: 2 SC in first stitch, SC in next 5, repeat around, join, chain 1 (14 SC)
Round 7: 2 SC in first stitch, SC in next 6, repeat around, join, chain 1 (16 SC)
Round 8: 2 SC in first stitch, SC in next 7, repeat around, join (18 SC)
Fasten off leaving long tail.
Stitch ears to either side of hat. Lay hat flat and work your tapestry need through the edge stitches of hat (starting at about round 3) and bottom edge of ears until it is secured onto side of hat.

Nose:
with pink yarn
Magic Ring, chain 1 and make 2 SC + 2 HDC + 2SC + 2 HDC + 2 SC, join to first SC, fasten off leaving long tail.
Stitch onto bottom center of hat (a row or two above the ribbed edge).
Add two whiskers to either side of the nose using a long strand of white or black yarn and your tapestry needle.

Stitch on those cute cartoon eyes!

This kitty hat is so cute!


Crochet those eyes in any colors and make multiple cat hats!
Cartoon Crochet Eye Pattern and Video Tutorial can be found HERE
Tag me in those cat hats using @RepeatCrafterMe or #RepeatCrafterMe on social media.
FOLLOW ME for more FREE Crochet!
Repeat Crafter Me Facebook
Repeat Crafter Me Instagram
Repeat Crafter Me Pinterest
Repeat Crafter Me YOUTUBE
These cartoon eyes would also look great on any of the animals in my new book Crochet Cute Forest Friends! Now available for pre-order.
The post Crochet Cartoon Eye Cat Hat first appeared on Repeat Crafter Me.
The post Crochet Cartoon Eye Cat Hat appeared first on Repeat Crafter Me.